Windows 7 Guide
Detailed instructions for printing posters to the Edgemont Road plotter from either your Windows 7 machine or from the Windows Terminal Server, cvtsa.ad.nrao.edu.
Printing from Microsoft Powerpoint
Open Microsoft Powerpoint by clicking the Start  button, then "All Programs" > "Microsoft Office" > "Microsoft Powerpoint 2010".
Click "File" then "Open" and navigate to the file location.
If you are using cvtsa.ad.nrao.edu to print from, the file must have been previously saved to your filer share and you must also have mapped a network drive to your account on cvtsa.ad.nrao.edu.
|
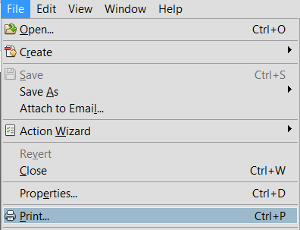
Click the "File" tab in the Ribbon, then click "Print" to open the Print menu. |
|
|
|
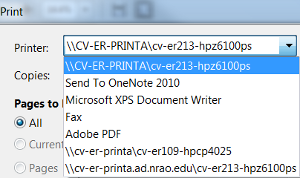
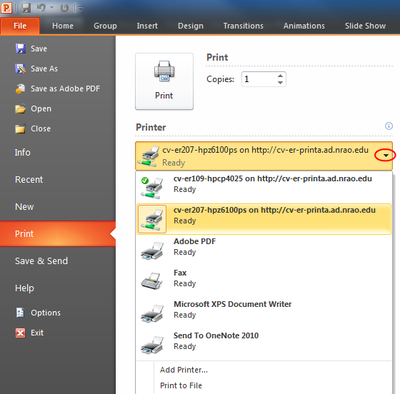
Print Menu Click the small arrow on the right of the "Printer" button to display available printers. |
|
|
|
If the plotter name (cv-er207-hpz6100ps) doesn't appear as an option, follow the instructions on "Add Additional Printers." |
|
|
|
Returning to the Print menu, the "Printer" button displays: "cv-er207-hpz6100ps on cv-er-printa.ad.nrao.edu". Click "Printer Properties" to open the Document Properties dialog.
|
|
|
|
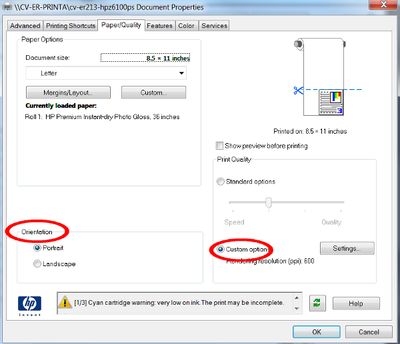
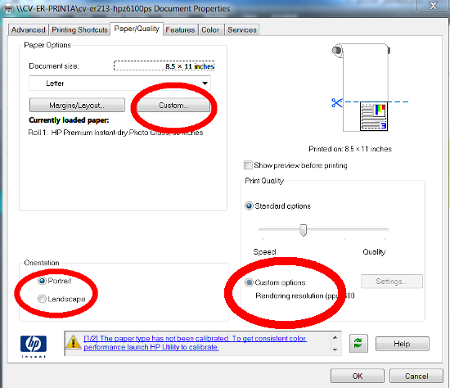
Document Properties Dialog (Windows Printer Driver Interface) On the "Paper/Quality" tab, choose the appropriate Orientation selection (the default is portrait): Portrait - maximum width of 35.88 inches Landscape - maximum height of 35.88 inches Select the "Custom options" radio button, near the bottom-right, then click "Settings" to display the Custom Print Quality Options dialog. |
|
|
|
Note: Creating a custom size which uses the maximum width of 35.88" for portrait or 35.88" for landscape, will produce a poster with a 3/8th inch margin along this side. |
||
|
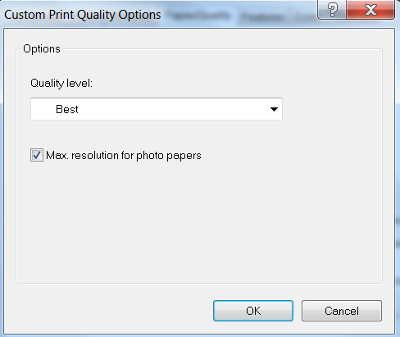
Custom Paper Size Dialog Window Change the rendering resolution from the default, Normal-Fast (600ppi). Using the "Best" quality level will increase resolution, blend transparent graphics, and print soft shadows in your print job; it doesn't take that much time - only about 8 minutes for a 35x35 high-resolution image plus a few minutes to dry. The Z6100 plotter can attain a print resolution of up to 2400 × 1200 optimized dots per inch (dpi), from a 1200 × 1200 dpi input when using the default photo paper, the "Best" print-quality option, and the "Maximum resolution for the photo paper" option (check-box in Custom Options). |
||
|
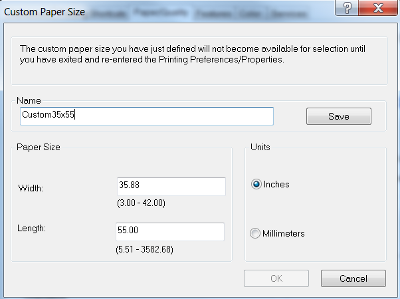
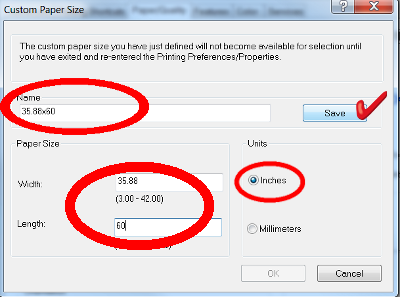
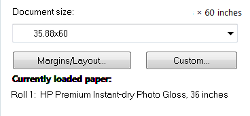
Enter a name for the custom size in the "Name" field; the field is limited to 15 characters. The poster's dimensions ("35.88x60") are used as the name of the custom size in the example image to the right. Enter the desired dimensions in the "Width" and "Length" fields, and click "Save," then click "Ok."
|
|
|
|
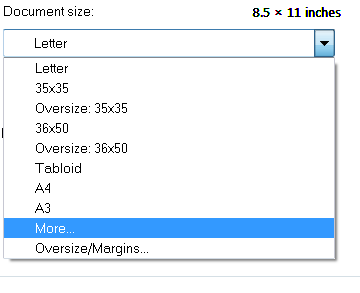
If you have previously saved a custom size, click the arrow in the "Document size" field, then click "More" to display the available sizes. The "Custom" area is at the bottom of the file tree.
|
|
|
| Click "OK" to close the Custom Paper Size dialog. The custom document size you just created should appear in the "Document size" field. |
|
|
|
Document Properties Dialog Window Remaining on the Paper/Quality tab, if you entered a size that is larger than the paper, the message "Paper size selected is larger than loaded paper. Please verify your printer setup" will appear in the HP message box at the bottom of the dialog. Ignore any other messages in this box. |
||
|
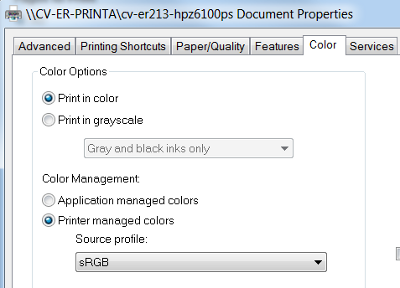
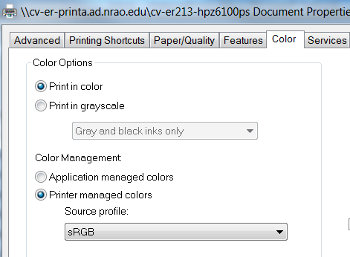
Next, click the "Color" tab, and select "Print in Color" under "Color Options." Under "Color Management," click "Printer managed colors," and then "sRGB" from the drop-down menu under "Source Profile." |
|
|
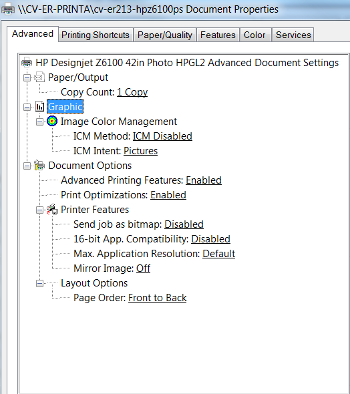
| Click the "Advanced" tab and ensure that the following settings are displayed: |
|
|
|
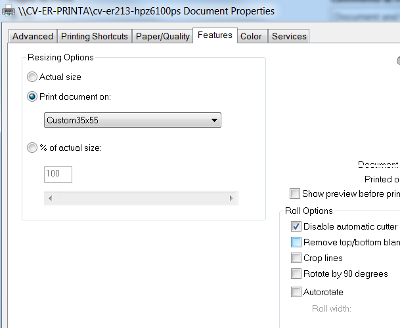
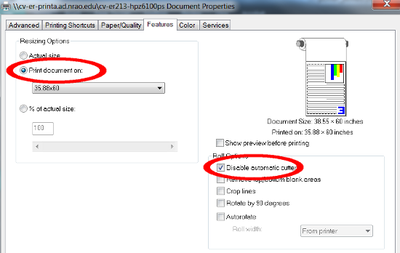
Click the "Features" tab in this dialog. Click the "Print document on:" radio button. The custom size you created earlier should display. Under "Roll Options" click the check-box next to "Disable Automatic Cutter." This will keep your poster attached to the roll until you press the "Form Feed/Cut" button on the plotter's right-side control panel. The Print Notification Box located at the bottom of the Document Properties window (on all tabs except Advanced), may show the warning: Paper size selected is larger than loaded paper width. Click "OK" to close the dialog.
|
|
|
|
Print Menu Returning to the Print menu, ensure that the following options are set: "Settings"
"Layout Options"
Ignore any message regarding "low toner" unless your file will not print. Retrieve your poster from Room 207.
|
|
|
Printing PDFs from Adobe Reader/Acrobat Pro
|
Begin by adding "cv-er207-hpz6100ps" as an additional printer in Windows 7. |
|
|
Returning to Adobe Pro, click the "File" tab, then select "Print" to open the Print dialog.
|
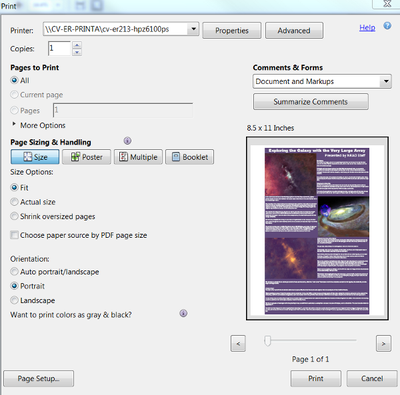
Print Dialog Window Click the arrow next to the "Printer" field and select "\\cv-er-printa.ad.nrao.edu\cv-er213-hpz6100ps" from the drop-down menu.
|
|
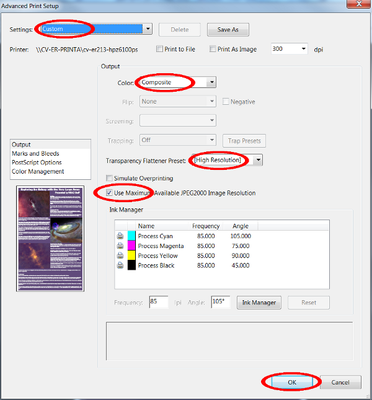
Click the "Advanced" button to open the Advanced Print Setup dialog.
Advanced Print Setup Dialog Window Click the arrow next to "Settings" and select "Custom" from the drop-down menu. Under "Output" select "Composite" from the "Color" drop-down menu. From the "Transparency Flattener Preset" menu, select "High Resolution" Check the box next to "Use Maximum Available JPEG2000 Image Resolution" Click "OK" to close the dialog.
|
|
|
Click "Properties" at the top of the Print dialog to open the Document Properties dialog.
Document Properties Dialog Window On the "Paper/Quality" tab, choose the appropriate Orientation selection (the default is portrait): Portrait - maximum width of 35.88 inches Landscape - maximum height of 35.88 inches Select the "Custom options" radio button, near the bottom-right, to change the rendering resolution from the default, "Normal-Fast (600ppi)."
|
|
|
Click the "Settings" button to open the "Custom Print Quality Options" window.
Using the "Best" quality level will increase resolution, blend transparent graphics, and print soft shadows in your print job, and it doesn't take that much time - only about 8 minutes for a 35x35 high-resolution image plus a few minutes to dry. Click "Ok" to close the dialog.
Remaining on the "Paper/Quality" tab, click "Custom" to change the document size from the default and open the Custom Paper Size dialog. See Windows 7 Verbose Instructions for Powerpoint, above, for more details about this area.
|
|
|
Custom Paper Size Dialog Window Enter a name for the custom size in the "Name" field. Enter the desired dimensions in the "Width" and "Length" fields, and click "Save." Click "OK" to close the dialog. Note: Creating a custom size of 35.88 x 35.88 inches will produce a poster with a 3/8th inch margin around all the edges. |
|
|
Click the "Color" tab, and select "Print in Color" under "Color Options." Under "Color Management," click "Printer managed colors," and then "sRGB" from the drop-down menu under "Source Profile." |
|
|
Click the "Advanced" tab and ensure that the following settings are displayed: |
|
|
Document Properties Dialog Window Returning to the Document Properties dialog, if you entered a size that is larger than the paper, the message "Paper size selected is larger than loaded paper. Please verify your printer setup" will appear in the HP message box at the bottom of the dialog. Ignore any other messages in this box.
|
|
|
Click the "Features" tab in this dialog. Click the "Print document on:" radio button. The custom size you created earlier should display. Under "Roll Options" click the checkbox next to "Disable Automatic Cutter." This will keep your poster attached to the roll until you press the "Form Feed/Cut" button on the plotter's right-side control panel. Click "OK" to close the dialog. |
 |
|
Print Dialog Window Returning to the Print Dialog, under "Page Sizing and Handling, click "Size," then click "Fit" under "Size Options." Under "Comments & Forms," to the left, select "Document and Markup" from the drop-down menu. Click "Print" to begin printing. Ignore any message regarding "low toner" unless your file will not print. Retrieve your poster from Room 207.
|
|

 the "Refresh" button.
 Click the "Print" button located in the upper left to begin printing.