
Accessing the cvpost cluster with VNC
Accessing the cvpost cluster with VNC
While ssh will work fine if you are on the internal NRAO network, if you are trying to display things from a remote site we recommend using VNC.
NOTE UPDATED: In the past, cluster nodes in Charlottesville could not access the bulk.cv.nrao.edu web server directly (where value added data products are often accessed), due to fundamental network architecture internals. That has now changed with an upgrade to said bulk server; please file a helpdesk ticket if you find otherwise.
Connect to the NRAO
If you are NRAO staff, from your local machine log in to the ssh portal login.cv.nrao.edu with your username (e.g., gmarx). Skip this section if you are physically at the NRAO.
ssh gmarx@login.cv.nrao.edu
If you are not NRAO staff, from your local machine log in to the ssh portal guest-login.cv.nrao.edu with your username (e.g., cv-4386). Skip this section if you are using an NRAO machine that is physically at the NRAO.
Please note that the screenshots below reference the host "ssh.cv.nrao.edu". If you are a non-staff member, you will need to substitute the host "guest-login.cv.nrao.edu".
ssh cv-4386@guest-login.cv.nrao.edu
Start the VNC server
From the ssh portal, or some other NRAO machine, login to the node assigned to you (e.g. cvpost050)
ssh cvpost050
As multiple sessions may be running concurrently, check for any before firing up a new session. To view active sessions on your node:
vncserver -list
(on RHEL8 systems this will give a warning about vncserver being "replaced"; you can safely ignore that message). If you want to stop an existing server, e.g. runing on X Display :19, simply type
vncserver -kill :19
Running "vncserver" with no arguments will start a new, additional session:
vncserver
The first time you run vncserver, it should prompt you to set a password. Do not use the same password used for your account! These passwords are insecure and sent over the network in clear text. Also, only the first 8 characters of this VNC password are used.
The system should then return something like:
New 'cvpost050:1 (cv-4386)' desktop is cvpost050:1
The 1 in this example is your session. You will need this number later when you use your VNC client.
Connect to the VNC server
The VNC Client used to connect to the VNC server is different depending on the OS you are using (Linux/RHEL, Linux/Ubuntu, MacOS)
Linux (RHEL, CentOS, SL, OEL, Debian, RockyLinux, AlmaLinux)
If your local machine is an RHEL or Debian derivative, use vncviewer to start the VNC connection like so (assuming the session number is 1):
vncviewer -via cv-4386@guest-login.cv.nrao.edu cvpost050:1
If you are physically at the NRAO, skip the "-via" syntax like so
vncviewer cvpost050:1
Linux (Ubuntu)
NOTE: These instructions and screen shots are for an old, now unsupported version of Ubuntu. The essence of the instructions remain correct, but the appearance of the windows has changed substantially.
If your local machine is Linux/Ubuntu, use remmina to start the VNC connection like so (assuming the session number is 1)
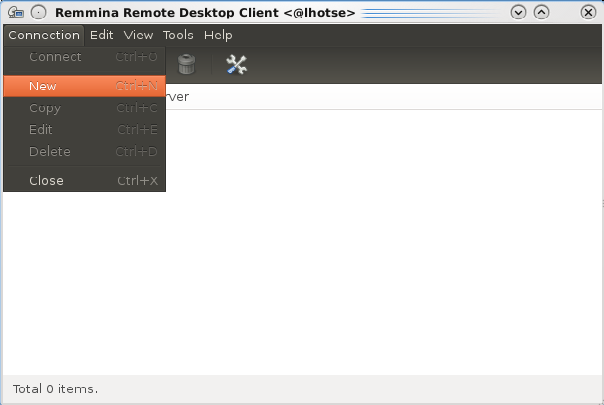
Launch the remmina program and select Connection -> New
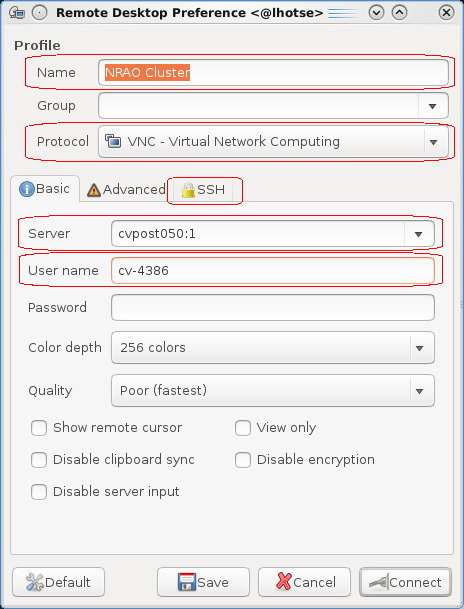
Set the Name to something descriptive like NRAO Cluster, change the Protocol to VNC - Virtual Network Computing, set the Server to the node assigned to you followed by a colon and the session number (e.g. cvpost050:1), set the User name (e.g. cv-4386). If you see Repeater, leave it blank. Then select the SSH tab
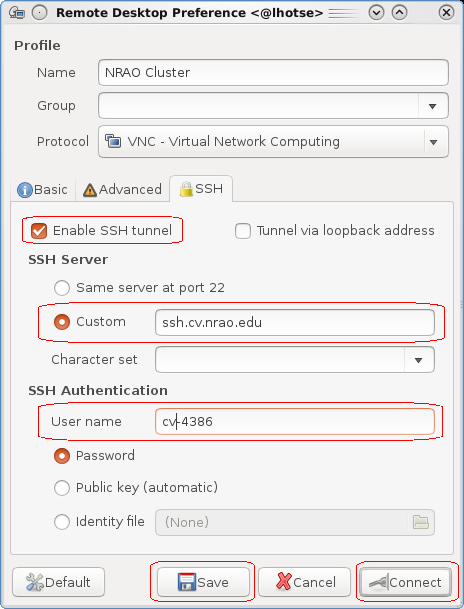
Check the box for Enable SSH tunnel, select Custom and set it to guest-login.cv.nrao.edu, set the User name (e.g. cv-4386), click on Save. The window will disappear (Ubuntu 16+) so then right-click on the entry for this connection in the main Remmina window and then choose Connect.
Mac
There are two approaches to VNC connection on a Mac: Built-in screen sharing, or TigerVNC. This assumes you are connecting from the outside. Regardless of which client you choose, you should first establish a tunnel to the relevant node in a terminal window:
ssh -L 59XX:cvpost050:59YY username@guest-login.cv.nrao.edu
Where "XX" is a number between 01 and 99 that you choose. The "YY" number after the cvpost050 name in this example corresponds to the VNC session number on the remote machine. Leave that terminal in the background. Obviously, you should replace "cvpost050" with the actual node on which you have access.
We recommend TigerVNC as it has advantages over the built in Mac screen sharing, such as portal resizing, and functioning copy/paste between VNC session and native Mac windows. To connect using TigerVNC, start the program and in this case enter:
localhost:59XX
Where "XX' is the number (01-99) from above.
Alternatively, for built in screen sharing, in the Finder, pull down the GO menu and choose Connect to Server. For the server address, specify:
vnc://localhost:59XX
You will be prompted for your VNC password.
If you are going to be running mpicasa, we strongly recommend using TigerVNC. Sessions tend to hang when using Screen Sharing while running mpicasa. TigerVNC generally lives on github: https://github.com/TigerVNC/tigervnc/releases.
NOTE: Closing a viewer window (TigerVNC, Screen Sharing, etc) does NOT kill the session. You can reconnect later and continue exactly where you left off. Open windows and active processes will remain. Connect to the same remote port number to resume.
Windows
Open a cmd terminal by right clicking on the start menu, selecting Run and type cmd. In the terminal, start an SSH tunnel like below. In the following examples, 590X is derived by adding 5900 to the session number from above. Skip this step if you are on the NRAO internal network (Note: if you are connecting from the guest WiFi, you cannot skip this step!). (e.g., 5902, 5903, etc.).
ssh -L 590X:cvpost050:590X cv-4386@guest-login.cv.nrao.edu
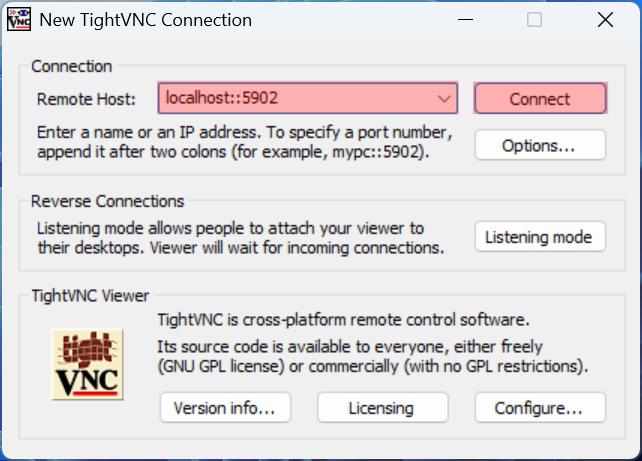
Then use a VNC client like TightVNC For the Remote Host, use the hostname localhost followed by two colons and then the port number you used above (e.g. 5902, 5903, etc.). Then click Connect.
End the VNC server
Commands that are run in this VNC session will continue to run even after closing your local VNC client. Once all processes are done, you should close your VNC server by connecting via ssh again to the nmpost cluster node and running (assuming the session number is 1)
vncserver -kill :1
Common difficulties
RHEL8 issues
Issues may arise from the upgrade to RHEL8. Many of these can be solved by exiting VNC and making sure it is no longer running (e.g. vncserver -kill :1), removing your xstartup (e.g. rm -f ~/.vnc/xstartup), and restarting VNC (e.g. vncserver).
Black screen on RHEL8
Since the move to RHEL8, it has become more common for users to encounter a black screen when attempting to connect to a VNC session. This usually happens when more than one VNC server session is started. The default xstartup file provided with RHEL 8 does not work well. As a workaround, run the following and then restart VNC.
echo '#!/bin/sh' > ~/.vnc/xstartup
echo 'dbus-launch --exit-with-session gnome-session' >> ~/.vnc/xstartup
chmod 755 ~/.vnc/xstartup
Terminal window fails to open
If you find you are unable to open gnome-terminal or xterm in the VNC session and you are using a MacOS machine, try the following.
This happens often for MacOS users. Navigate to your teminal app's settings and then to the profiles. Somewhere (the location changes per MacOS version) there should be a checkbox to "Set local variables automatically". Uncheck this, restart the terminal on your MacOS machine, kill the prevous VNC server on the NRAO machine and try the process again.
What is happening is the MacOS machine is setting the LC_CTYPE environment variable which is getting propagated via ssh to the NRAO machine and into the VNC server where many programs like gnome-terminal, xterm, etc read this and can be confused by it.
